Software Renderer Tutorial - Depth
In this tutorial we will be adding a depth test for each fragment that is drawn to the buffer. First we will modify the test program to render the two planes at different z depths. Here is the code I am using for the matrices and drawing the planes:
let translate = Mat4.translate(0, 0, zOffs);
let translate2 = Mat4.translate(0, 0, -2);
let scale = Mat4.scale(.3, .3, .3);
let rotate = Mat4.rotateX(val);
let rotate2 = Mat4.rotateX(val * 1.532);
let uniforms = {modelMatrix: translate.mult(scale.mult(rotate)), projMatrix: perspective};
let uniforms2 = {modelMatrix: translate2.mult(scale.mult(rotate2)), projMatrix: perspective};

drawTriangles(buffer, square, vertexShader, fragShader, uniforms);
drawTriangles(buffer, square, vertexShader, fragShader, uniforms2);
The problem becomes pretty clear when we see one plane move in front of the other but still drawn behind it:
Currently, we are overwriting each pixel that is drawn to the buffer but when rendering a 3d scene it is possible for triangles to render out of order. In the perspective tutorial, our perspective matrix scaled the z value of vectors down to a value between -1 and 1 so we can use that value to determine if our fragment is above or below the previous one. To calculate the depth of each fragment, we will just interpolate the z value as the second to last value in our array of varyings. It turns out the z' value after the perspective multiply is already in 1/z space so we do not have to divide by z before interpolating. To do this interpolation, in the perspectiveCorrectTriangleVarying function, I added the z value for each point so that it would be the second to last value in the array and also is not divided by w.
function perspectiveCorrectTriangleVarying(t) {
	let v1 = t.p1.varyingArray;
	let v2 = t.p2.varyingArray;
	let v3 = t.p3.varyingArray;

	for (let i = 0; i < v1.length; i++) {
		v1[i] /= t.p1.point.w;
		v2[i] /= t.p2.point.w;
		v3[i] /= t.p3.point.w;
	}

	v1.push(t.p1.point.z);
	v2.push(t.p2.point.z);
	v3.push(t.p3.point.z);

	v1.push(1/t.p1.point.w);
	v2.push(1/t.p2.point.w);
	v3.push(1/t.p3.point.w);
}
Now the z value should be available to each fragment so lets make sure we set our depth buffer up properly. A depth of 1 will be the furthest objects while a depth of -1 will be the closest objects so lets default the depth buffer to 1. If a fragment is closer (less than) the current depth then we will draw it. I added a depth array with the same dimensions as the image so we get one depth value per pixel and also added a line in the clear function to clear the depth to 1.
class Buffer {
	constructor(ctx, w, h) {
		this.imageData = ctx.createImageData(w, h);
		this.depth = new Array(w*h);
		this.depth.fill(1);
	}

	clear() {
		this.imageData.data.fill(0);
		this.depth.fill(1);
	}
}
We can now use this depth buffer value to conditionally render our fragments. Inside the doHalfTri function, we will need to check that the depth is between -1 and 1, then check if it is less than the current depth buffer value it is about to overwrite. If the new depth is in front of the fragment that is already drawn, then we will overwrite that fragment and depth with the new fragment and depth. I also threw in a null/zero alpha check for the fragment so we can automatically discard fragments that would not be drawn. Here is my implementation of the above logic for drawing fragments that goes inside of the doHalfTri function:
let frag = fragmentShader(varyingBase, uniforms);
if (frag && frag.a !== 0) {
	let depth = varyingBase[varyingBase.length - 2];
	if (depth > -1 && depth < 1) {
		let idx = j + i * buffer.imageData.width;
		if (depth <= buffer.depth[idx]) {
			buffer.depth[idx] = depth;
			setPixelAlphaBlend(buffer.imageData, j, i, frag.r, frag.g, frag.b, frag.a);
		}
	}
}
incrementVaryingX(varyingBase, varyingSlopes);
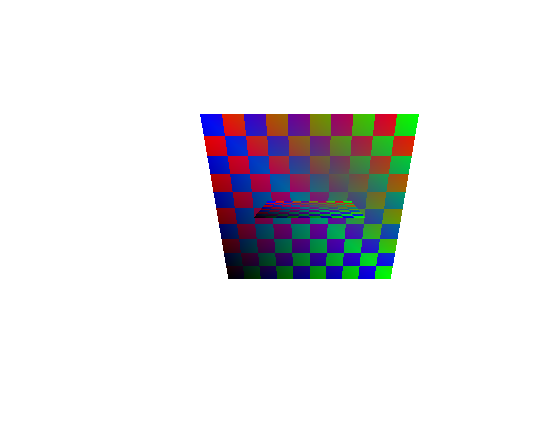
Our current demo should now work and when the planes cross and will look something like this:
Everything to do perspective 3d graphics with depth checking is done so you may be tempted (and I would encourage you) to mess around with more complex graphics at this point. Unfortunately if anything passes behind the current camera, the renderer freezes up! It turns out this is due to some potential divide by zeros and very large triangles that can occur when an object gets too close to the camera’s position and the z value approaches or equals zero. We will fix this in the next tutorial by adding clipping to our near and far planes so only the parts of triangles between the near and far clipping planes are drawn.