Software Renderer Tutorial - Textures
Texturing will allow us to put images onto our flat polygons and will open the door to things like bump maps, shadows, and reflection. I won’t be going over the latter points in this tutorial however some will be used in the demo at the end. The code we write to save and use textures will be flexible enough to allow you to mimic many modern shader effects. By the end, we will have two different filters for textures and a way to load them from files.
We will start out by loading the texture from an image. We already have the buffer class so lets just use that to store the textures as well! The details of this may be specific to the language you are using but we just need to get the values of the image pixels into the buffer object. In javascript, an easy way to do this is to draw the image to a canvas and then use that canvas to get an imagedata object for the buffer. Since javascript will load the image asynchronously we will have to do this in an onload callback and use the temporary empty buffer until the image loads. If a language blocks to load the image, this trick is not necessary and the data can just be loaded directly into a new buffer object.
function loadImageToBuffer(buf, path) {
	let image = new Image();
	image.src = path;
	image.onload = function() {
		let tmpCanvas = document.createElement("canvas");
		tmpCanvas.width = image.width;
		tmpCanvas.height = image.height;
		let tmpCtx = tmpCanvas.getContext("2d");
		tmpCtx.drawImage(image, 0, 0);
		buf.imageData = tmpCtx.getImageData(0, 0, image.width, image.height);
	}
}
Now that we have the pixels in a buffer we need to put them onto a triangle. When we draw a triangle we are already calculating u and v coordinates that we set to fall in the range 0 to 1. If we scale this value up to the size of the texture then we can simply map a rectangular texture onto the u/v coordinates where the upper left of the texture is (0, 0) and the lower right of the texture is (1, 1). Writing this code, we would quickly find that the u and v coordinates for each pixel, even when scaled up result in fractional values. We can use several methods to determine how this fractional value turns into a pixel color. The simplest method is to round to the nearest whole coordinate value. This will give us nearest-neighbor filtering and will result in a blocky pixelated look where the pixels show up as squares when zoomed in. The other method we will implement is bilinear filtering. This is a fancy way of saying we fade the color linearly between pixels so a position of 0.5 would be half way between the colors of pixels at positions 0 and 1.
Let’s implement nearest-neighbor filtering first since it is the simplest and fastest. All of these methods will be inside the buffer class, allowing us to get values directly from buffers. First I created a method getColorXY that will take integer pixel coordinates and return the rgba value in a Point4.
getColorXY(x, y) {
	let idx = 4 * (x + y * this.imageData.width);
	let p = new Point4();
	//xyzw -> rgba
	p.x = this.imageData.data[idx];
	p.y = this.imageData.data[idx + 1];
	p.z = this.imageData.data[idx + 2];
	p.w = this.imageData.data[idx + 3];
	return p;
}
Next I implemented the getColorNearest function which takes u and v coordinates, multiplies them by the size of the texture and clamps them to the size of the texture before calling the getColorXY function from before.
getColorNearest(i, j) {
	let x = i * this.imageData.width;
	let y = j * this.imageData.height;
	x = Math.floor(x);
	y = Math.floor(y);
	x = Math.max(0, Math.min(this.imageData.width - 1, x));
	y = Math.max(0, Math.min(this.imageData.width - 1, y));
	return this.getColorXY(x, y);
}
We will not be using depth textures in this tutorial but I also duplicated the above functions for the depth buffer below.
getDepthNearest(i, j) {
	let x = i * this.imageData.width;
	let y = j * this.imageData.height;
	x = Math.floor(x);
	y = Math.floor(y);
	x = Math.max(0, Math.min(this.imageData.width - 1, x));
	y = Math.max(0, Math.min(this.imageData.width - 1, y));
	return this.getDepthXY(x, y);
}

getDepthXY(x, y) {
	let idx = (x + y * this.imageData.width);
	return this.depth[idx];
}
Now to test this we can load in a texture:
let brickTex = new Buffer(ctx, 1, 1);
loadImageToBuffer(brickTex, "/assets/software_renderer/brick.png");
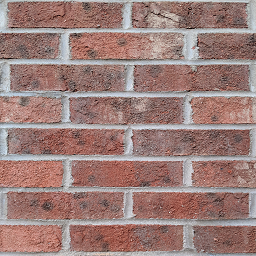
Here is the texture I am using.
Now we just need to add it to our uniforms for each polygon we are drawing.
let uniforms = {modelMatrix: translate.mult(scale.mult(rotate)), projMatrix: perspective, texture: brickTex};
In the shader we can now call our nearest neighbor using the uv coordinates that we were already passing in. Our final fragment shader should call getColorNearest for each pixel and will look like this:
let fragShader = (varyings, uniforms) => {
	let u = getVarying(varyings, 4);
	let v = getVarying(varyings, 5);

	let tex = uniforms.texture;

	let col = tex.getColorNearest(u, v);
	let alpha = col.w;

	return new Fragment(col.x, col.y, col.z, alpha);
}
The pixels should now be clearly visible as small squares on the texture when viewed up close:
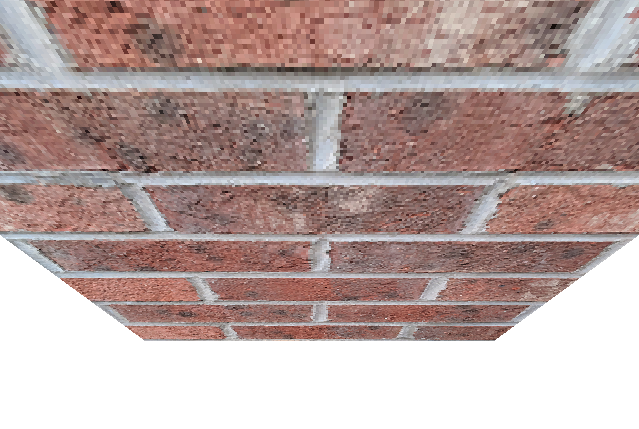
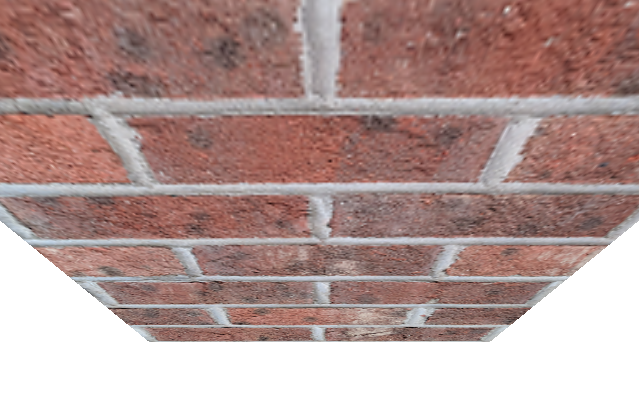
In some stylized applications, this may be the desired effect, but usually the pixels are less noticable when the texture is blurred rather than showing hard lines between pixels. To do this we will implement bilinear filtering. The easiest way to conceptualize this is to think of the 4 pixels around a point. The pixels form a square around the point that is being calculated. The distance from the point to each side of the sqare determine the proportion of the point’s color that come from each side. The distance from the point to the top and bottom of the square determine the proportion of the point’s color that come from the top and bottom pairs of pixels. These operations can be done in either order. Here is the code for the bilinear methods for both depth and color:
	getColorBilinear(i, j) {
		let x = i * this.imageData.width;
		let y = j * this.imageData.height;
		let xLow = Math.floor(x - .5);
		let yLow = Math.floor(y - .5);
		let xHigh = Math.floor(x + .5);
		let yHigh = Math.floor(y + .5);
		xLow = Math.max(0, Math.min(this.imageData.width - 1, xLow));
		xHigh = Math.max(0, Math.min(this.imageData.width - 1, xHigh));
		yLow = Math.max(0, Math.min(this.imageData.height - 1, yLow));
		yHigh = Math.max(0, Math.min(this.imageData.height - 1, yHigh));
		let aX = (x - .5) - Math.floor(x - .5);
		let aY = (y - .5) - Math.floor(y - .5);
		let ll = this.getColorXY(xLow, yLow);
		let lh = this.getColorXY(xLow, yHigh);
		let hl = this.getColorXY(xHigh, yLow);
		let hh = this.getColorXY(xHigh, yHigh);
		let yLowInterp = ll.add(hl.sub(ll).scale(aX));
		let yHighInterp = lh.add(hh.sub(lh).scale(aX));
		return yLowInterp.add(yHighInterp.sub(yLowInterp).scale(aY));
	}

	getDepthBilinear(i, j) {
		let x = i * this.imageData.width;
		let y = j * this.imageData.height;
		let xLow = Math.floor(x - .5);
		let yLow = Math.floor(y - .5);
		let xHigh = Math.floor(x + .5);
		let yHigh = Math.floor(y + .5);
		xLow = Math.max(0, Math.min(this.imageData.width - 1, xLow));
		xHigh = Math.max(0, Math.min(this.imageData.width - 1, xHigh));
		yLow = Math.max(0, Math.min(this.imageData.height - 1, yLow));
		yHigh = Math.max(0, Math.min(this.imageData.height - 1, yHigh));
		let aX = (x - .5) - Math.floor(x - .5);
		let aY = (y - .5) - Math.floor(y - .5);
		let ll = this.getDepthXY(xLow, yLow);
		let lh = this.getDepthXY(xLow, yHigh);
		let hl = this.getDepthXY(xHigh, yLow);
		let hh = this.getDepthXY(xHigh, yHigh);
		let yLowInterp = ll + (hl - ll) * aX;
		let yHighInterp = lh + (hh - lh) * aX;
		return yLowInterp + (yHighInterp - yLowInterp) * aY;
	}
Changing the function call in your shader to getColorBilinear should now show something similar to the following:
I have modified the example code to include a zoom-in zoom-out that clearly shows the differences between the filters. Click the Bilinear button to toggle between bilinear and nearest filtering.