Software Renderer Tutorial - Vertex Shaders
Before now we have had to specify the exact position of every vertex. Vertex shaders will allow us to manipulate the positions of vertices in more complex ways. Fragment shaders are run for each pixel or ‘fragment’ on a screen or buffer, so vertex shaders are run for each vertex before it is passed to the fragment shaders. If we want to shift triangles to the right for example, we could add a constant to the x position in the vertex shader. This would shift all vertices by that constant value.
Just like the fragmentShader was passed into the drawTriangle method and called for each pixel, we will make a function in shader.js called drawTiangles that draws an array of triangles and calls the vertexShader callback for each vertex before calling the drawTriangle function.
export function drawTriangles(buffer, triangles, vertexShader, fragmentShader, uniforms) {
	for (let i = 0; i < triangles.length; i++) {
		let t = triangles[i];
		let tNext = new Triangle();
		tNext.p1 = vertexShader(t.p1, uniforms);
		tNext.p2 = vertexShader(t.p2, uniforms);
		tNext.p3 = vertexShader(t.p3, uniforms);
		drawTriangle(buffer, tNext, fragmentShader, uniforms);
	}
}
Notice that I am also passing the uniforms object into the drawTriangle function. In javascipt we are just using an object but in most languages it would be a map, hashmap, or dictionary. We will be using this to pass in parameters that are constant into both the vertex and fragment shaders. We need to update our drawTriangle function to pass these uniforms by updating the following lines:
function drawTriangle(buffer, triangle, fragmentShader, uniforms) {
doHalfTri(buffer, yScanStart, yScanEnd, p1.clone(), vec1.x/vec1.y, p1.clone(), vec2.x/vec2.y, triangle.p1, varyingSlopes, fragmentShader, uniforms);
doHalfTri(buffer, yScanStart, yScanEnd, start1.clone(), vec1.x/vec1.y, start2.clone(), vec2.x/vec2.y, triangle.p1, varyingSlopes, fragmentShader, uniforms);
function doHalfTri(buffer, scanStart, scanEnd, p1, slope1, p2, slope2, baseVertex, varyingSlopes, fragmentShader, uniforms) {
let frag = fragmentShader(varyingBase, uniforms);
Congratulations, you can now write vertex shaders. Our vertex shaders will let us move triangles around in bulk. We could for instance pass all of the triangles of a player mesh into the drawtriangles function and change their position to the position of the player. This is useful, but not the only powerful feature of vertex shaders. Another thing we might want to do is calculate a value in the vertex shader and pass it on as a varying. That way, calculated values in the vertex shader can be interpolated across the face of a triangle. This can be useful with smoothed lighting and shading or coloring our vertices. Lets change the vertex to contain both attributes and varyings. Attributes will be passed into the vertex shader and the vertex shader will return a vertex with a list of varyings. Some of these may be attributes but others may be computed in the vertex shader. To do this, all we need to do is update the vertex class.
export class Vertex {
	constructor(point, attributes, varyingArray) {
		this.point = point;
		this.varyingArray = varyingArray || [];
		this.attributes = attributes;
	}
}
Now we can manipulate vertices in the vertex shader, pass new varying values and get those varying values in the fragment shader. But what is the best way to manipulate vertices? It is pretty simple to shift a vertex in the x, y, or z direction, but when we want to do something like rotation, things could get messy. To aid with this we need matrices. A matrix can represent a translation, a rotation, or scaling (and other operations we will get to later). I hope to make it clear by the end of this section and the next how powerful and useful matrices are for graphics. It is standard in graphics to use 4x4 matrices. The matrices operate on vectors by matrix multiplication. Since the rules for matrix multiplication require matrices to be compatible sizes in order to be multiplied (an m by n matrix can only be multiplied by an n by p matrix) we will need to make a Point4 class that gives us a lot of the same functions as our Point3 class but which can also be multiplied as if it were a 4x1 matrix. While you are free to exclusively use Point4 and replace previous references to Point3, I will be using Point3 objects in the main.js file and converting them to Point4 objects in the vertex shader. Here is our Point4 class, mostly copy-pasted from the Point3 class:
export class Point4 {
	constructor(x, y, z, w) {
		this.x = x || 0;
		this.y = y || 0;
		this.z = z || 0;
		this.w = w || 0;
	}

	static fromPoint3(p3, w) {
		return new Point4(p3.x, p3.y, p3.z, w);
	}

	sub(p) {
		return new Point4(this.x - p.x, this.y - p.y, this.z - p.z, this.w - p.w);
	}

	add(p) {
		return new Point4(this.x + p.x, this.y + p.y, this.z + p.z, this.w + p.w);
	}

	cross2(p) {
		return this.x * p.y - this.y * p.x;
	}

	clone() {
		return new Point4(this.x, this.y, this.z, this.w);
	}
}
In the “Full source code” section I accidentally used a single | in the Point4 constructor which lead to some weird behavior. || 0 simply ensures that the value is not undefined while | 0 will convert the value to an integer. Using || 0 is the intended behavior, as rounding all of our vectors might have unintended consequences!
Now it’s time to work on our matrices. Our matrix class will need an array of 16 values since it is a 4x4 matrix. Here is our base matrix class in math.js:
export class Mat4 {
	constructor() {
		this.vals = new Array(16).fill(0);
	}
}
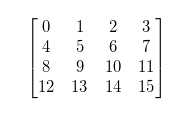
There are several ways we could map the array indices to the values in the matrix. I will be using row major order:
Now we will need to implement matrix multiplication. There are plenty of resources online to explain every detail of matrix multiplication. I find that the most intuitive explanation is that every number in the output matrix is a dot product of two vectors. The first vector is the row corresponding to the output row in the left matrix. The second vector is the column corresponding to the output column in the right matrix. The dot product is just x*x + y*y + z*z …etc so this can be extrapolated to matrices of any size.
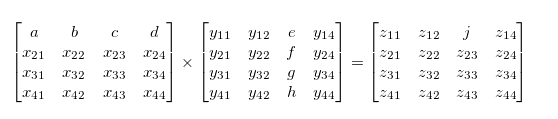
In the image above, j = a*e + b*f + c*g + d*h. This must be done for every point in the output matrix. Here is the matrix multiplication for 4x4 (mat4) and 4x1 matrices (point4).
	mult(m2) {
		let ret = new Mat4();
		for (let i = 0; i < 4; i++) {
			for (let j = 0; j < 4; j++) {
				let idx = i + j * 4;
				for (let k = 0; k < 4; k++) {
					//dot product of the j'th row from m1 (this) and the i'th column from m2
					ret.vals[idx] += this.vals[k + j * 4] * m2.vals[i + k * 4];
				}
			}
		}
		return ret;
	}

	multVec4(vec) {
		let ret = new Point4();
		let vecV = [vec.x, vec.y, vec.z, vec.w];
		let retV = [0, 0, 0, 0];
		//multiply this x vec where vec is a 4x1 matrix
		for (let i = 0; i < 4; i++) {
			for (let j = 0; j < 4; j++) {
				retV[i] += this.vals[j + i * 4] * vecV[j];
			}
		}
		ret.x = retV[0];
		ret.y = retV[1];
		ret.z = retV[2];
		ret.w = retV[3];
		return ret;
	}
When multiplying a 4x4 matrix by a 4x1 matrix (our Point4) we will get a 4x1 matrix as a result.
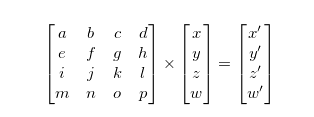
Later it may be useful to think of these as being equivalent to the following:
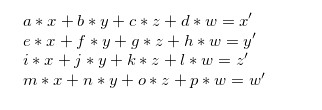
Given the equation above, we can start defining what our operations will look like. The scaling matrix where we want to scale the vector by (a, b, c) in the x, y, and z directions respectively looks like this:
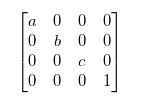
Eliminating terms with 0 in them we get the following simplified equations:
x' = x*a
y' = y*a
z' = z*a
w' = w
Now our code to make a scale matrix looks like this:
	static scale(x, y, z) {
		let m = new Mat4();
		m.vals[0] = x;
		m.vals[5] = y;
		m.vals[10] = z;
		m.vals[15] = 1;
		return m;
	}
The translation matrix where we will translate a vector by (a, b,c) in the x, y, and z directions looks like this:
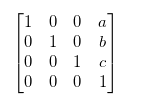
If we set our w value to be the constant value 1 we can simplify the following equations:
x' = x + w*a
y' = y + w*b
z' = z + w*c
w' = w
x' = x + a
y' = y + b
z' = z + c
w' = w
Setting the w value to 1 is crucial to allow for translation. If w is not set to 1 before, we can only do scaling and rotation in 3d. Here is the translation matrix function:
	static translate(x, y, z) {
		let m = new Mat4();
		m.vals[0] = 1;
		m.vals[5] = 1;
		m.vals[10] = 1;
		m.vals[15] = 1;

		m.vals[3] = x;
		m.vals[7] = y;
		m.vals[11] = z;
		return m;
	}
Rotation is a bit more complicated, but rotating around a single axis can be pretty simple. If we are rotating around the z axis then the z value should remain untouched. The x and y values will be the ones changing. Our final equations should look like this:
x' = x*cos(a) + y*sin(a)
y' = x*-sin(a) + y*cos(a)
z' = z
w' = w
which is the same as this matrix
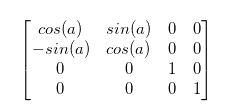
Here is the function for the rotationZ matrix:
	static rotateZ(r) {
		let m = new Mat4();
		m.vals[10] = 1;
		m.vals[15] = 1;

		m.vals[0] = Math.cos(r);
		m.vals[1] = Math.sin(r);
		m.vals[4] = -Math.sin(r);
		m.vals[5] = Math.cos(r);
		return m;
	}
There are two quick changes we will want to make before using the vertex shaders. Drawing things to the screen will be simpler if our screen coordinates go from (-1,-1) to (1,1) with the center being at (0,0). To fix this, lets rescale the vectors in the drawTriangle function. Be sure to do this before calculating vL and vR.
	//lets rescale the -1 to 1 point x and y coordinates to be buffer coordinates 0 - width and 0 - height
	let xScale = buffer.imageData.width / 2;
	let yScale = buffer.imageData.height / 2;

	p1.x = (p1.x + 1) * xScale;
	p1.y = (p1.y + 1) * yScale;

	p2.x = (p2.x + 1) * xScale;
	p2.y = (p2.y + 1) * yScale;

	p3.x = (p3.x + 1) * xScale;
	p3.y = (p3.y + 1) * yScale;
And I also updated the buffer class with a clear function and to use the canvas context:
export class Buffer {
	constructor(ctx, w, h) {
		this.imageData = ctx.createImageData(w, h);
		this.depth = new Array(w*h);
		this.depth.fill(0);
	}

	clear() {
		this.imageData.data.fill(0);
	}
}
Lets see these new vertex shaders in action! Below I have implemented a simple demo incorporating all of the new features added in this section. The result is a square moving around the screen while growing, shrinking and rotating. A few important points to note about the code below:
- The w value is set to 1 in the vertex shader. Without this, our translation won’t work! (We are not done with the w value yet, our software renderer doesn’t implement the most useful feature of the w value but we will fix that in the next tutorial)
- The order in which matrices are multiplied is important! Try switching the order around to see what happens. Matrix operations happen from right to left so in the example below the points are rotated, then scaled, then translated, then the proportion is fixed
- The proportion matrix fixes the squished proportion of the screen. Now that we have rescaled the size of the buffer so that the upper left is (-1,-1) and the lower right is (1,1) this has squashed our screen coordinates a bit. The proportion matrix ensures that our square looks like a square, and not a skewed rectangle.
- The software renderer should not change values in the structs. If it does, this may cause problems like only the first frame rendering properly. Make sure you clone values when appropriate to prevent vertex and attribute data from being modified.
- One other cool side effect of using matrices that you may notice is that we are only passing one matrix in as a uniform, but that matrix is doing 4 operations for us! You can combine as many matrices as you want in any order to form a single matrix that will do all of those operations in the same order!
let val = 0;
let buffer = new Buffer(ctx, width, height);

let fragShader = (varyings) => {
	return new Fragment(varyings[0], varyings[1], varyings[2], varyings[3]);
}

let vertexShader = (vertex, uniforms) => {
	let newPoint = Point4.fromPoint3(vertex.point, 1);
	newPoint = uniforms.modelMatrix.multVec4(newPoint);
	return new Vertex(newPoint, [], vertex.attributes);
}

let v1 = new Vertex(new Point3(-1, -1, 0), [255, 0, 0, 255]);
let v2 = new Vertex(new Point3(1, -1, 0), [0, 255, 0, 255]);
let v3 = new Vertex(new Point3(1, 1, 0), [0, 0, 255, 255]);
let v4 = new Vertex(new Point3(-1, 1, 0), [0, 0, 0, 255]);

let tri1 = new Triangle(v1, v2, v3);
let tri2 = new Triangle(v1, v3, v4);

let square = [tri1, tri2];

function mainLoop() {
	val += .01;

	let xOffs = Math.sin(val*.5);
	let yOffs = .3*Math.sin(val*2);
	let size = (Math.sin(val*2.4) + 3) * .1;

	let proportion = Mat4.scale(1, width/height, 1);
	let translate = Mat4.translate(xOffs, yOffs, 0);
	let scale = Mat4.scale(size, size, size);
	let rotate = Mat4.rotateZ(val);
	let uniforms = {modelMatrix: proportion.mult(translate.mult(scale.mult(rotate)))};
	drawTriangles(buffer, square, vertexShader, fragShader, uniforms);

	ctx.putImageData(buffer.imageData, 0, 0);
	buffer.clear();
}

setInterval(mainLoop, 1000/60.0);
Full source code for this page can be found here.